一、搭建方案

Hexo + Github + Github Pages

二、搭建准备

1、安装Git

Mac自带,无需安装

Windows 自行网上搜索安装

2、安装NodeJS

Hexo是基于NodeJS编写,Mac上建议先安装homebrew

Node.js 版本需不低于 10.13,建议使用 Node.js 12.0 及以上版本

Mac

1
2
$ brew install node    # 安装node
$ npm -v & node -v # 查看安装版本

Windows

官网下载安装并配置环境

3、Github

Github 上创建一个新仓库。

仓库名必须是<用户名>.github.io,而且必须是public项目。

仓库创建完成在根目录新建一个index.html的文件并添加以下内容。

1
2
3
4
5
6
7
8
9
<!DOCTYPE html>
<html>
<head>
<title>Page Title</title>
</head>
<body>
<h1>Jeremy的个人博客</h1>
</body>
</html>

创建完成之后点击:

Settings -> Pages -> GitHub Pages 就可以看到个人博客的网址。

如果没有就等几分钟。

image-20220918140519443

能打开网址就表示成功了,接下来就是安装静态网站框架了。

三、安装Hexo

Hexo 是一个基于NodeJS的静态网站生成框架,优点是快速生成、部署方便、社区活跃、颜值高。

Hexo 官方文档

1、安装

1
2
$ npm install hexo-cli -g  # 全局安装
$ hexo -v # 查看版本

2、初始化项目

1
2
3
4
5
6
$ hexo init blog-hexo        # 初始化项目,文件夹目录具体可以查看官方文档
INFO Cloning hexo-starter https://github.com/hexojs/hexo-starter.git
INFO Install dependencies
INFO Start blogging with Hexo!
$ cd blog-hexo
$ npm install

3、启动

1
2
3
$ hexo g         # 生成静态文件,完整命令 hexo generate
$ hexo s # 启动本地服务,完整命令 hexo server
# 访问网址为: http://localhost:4000/
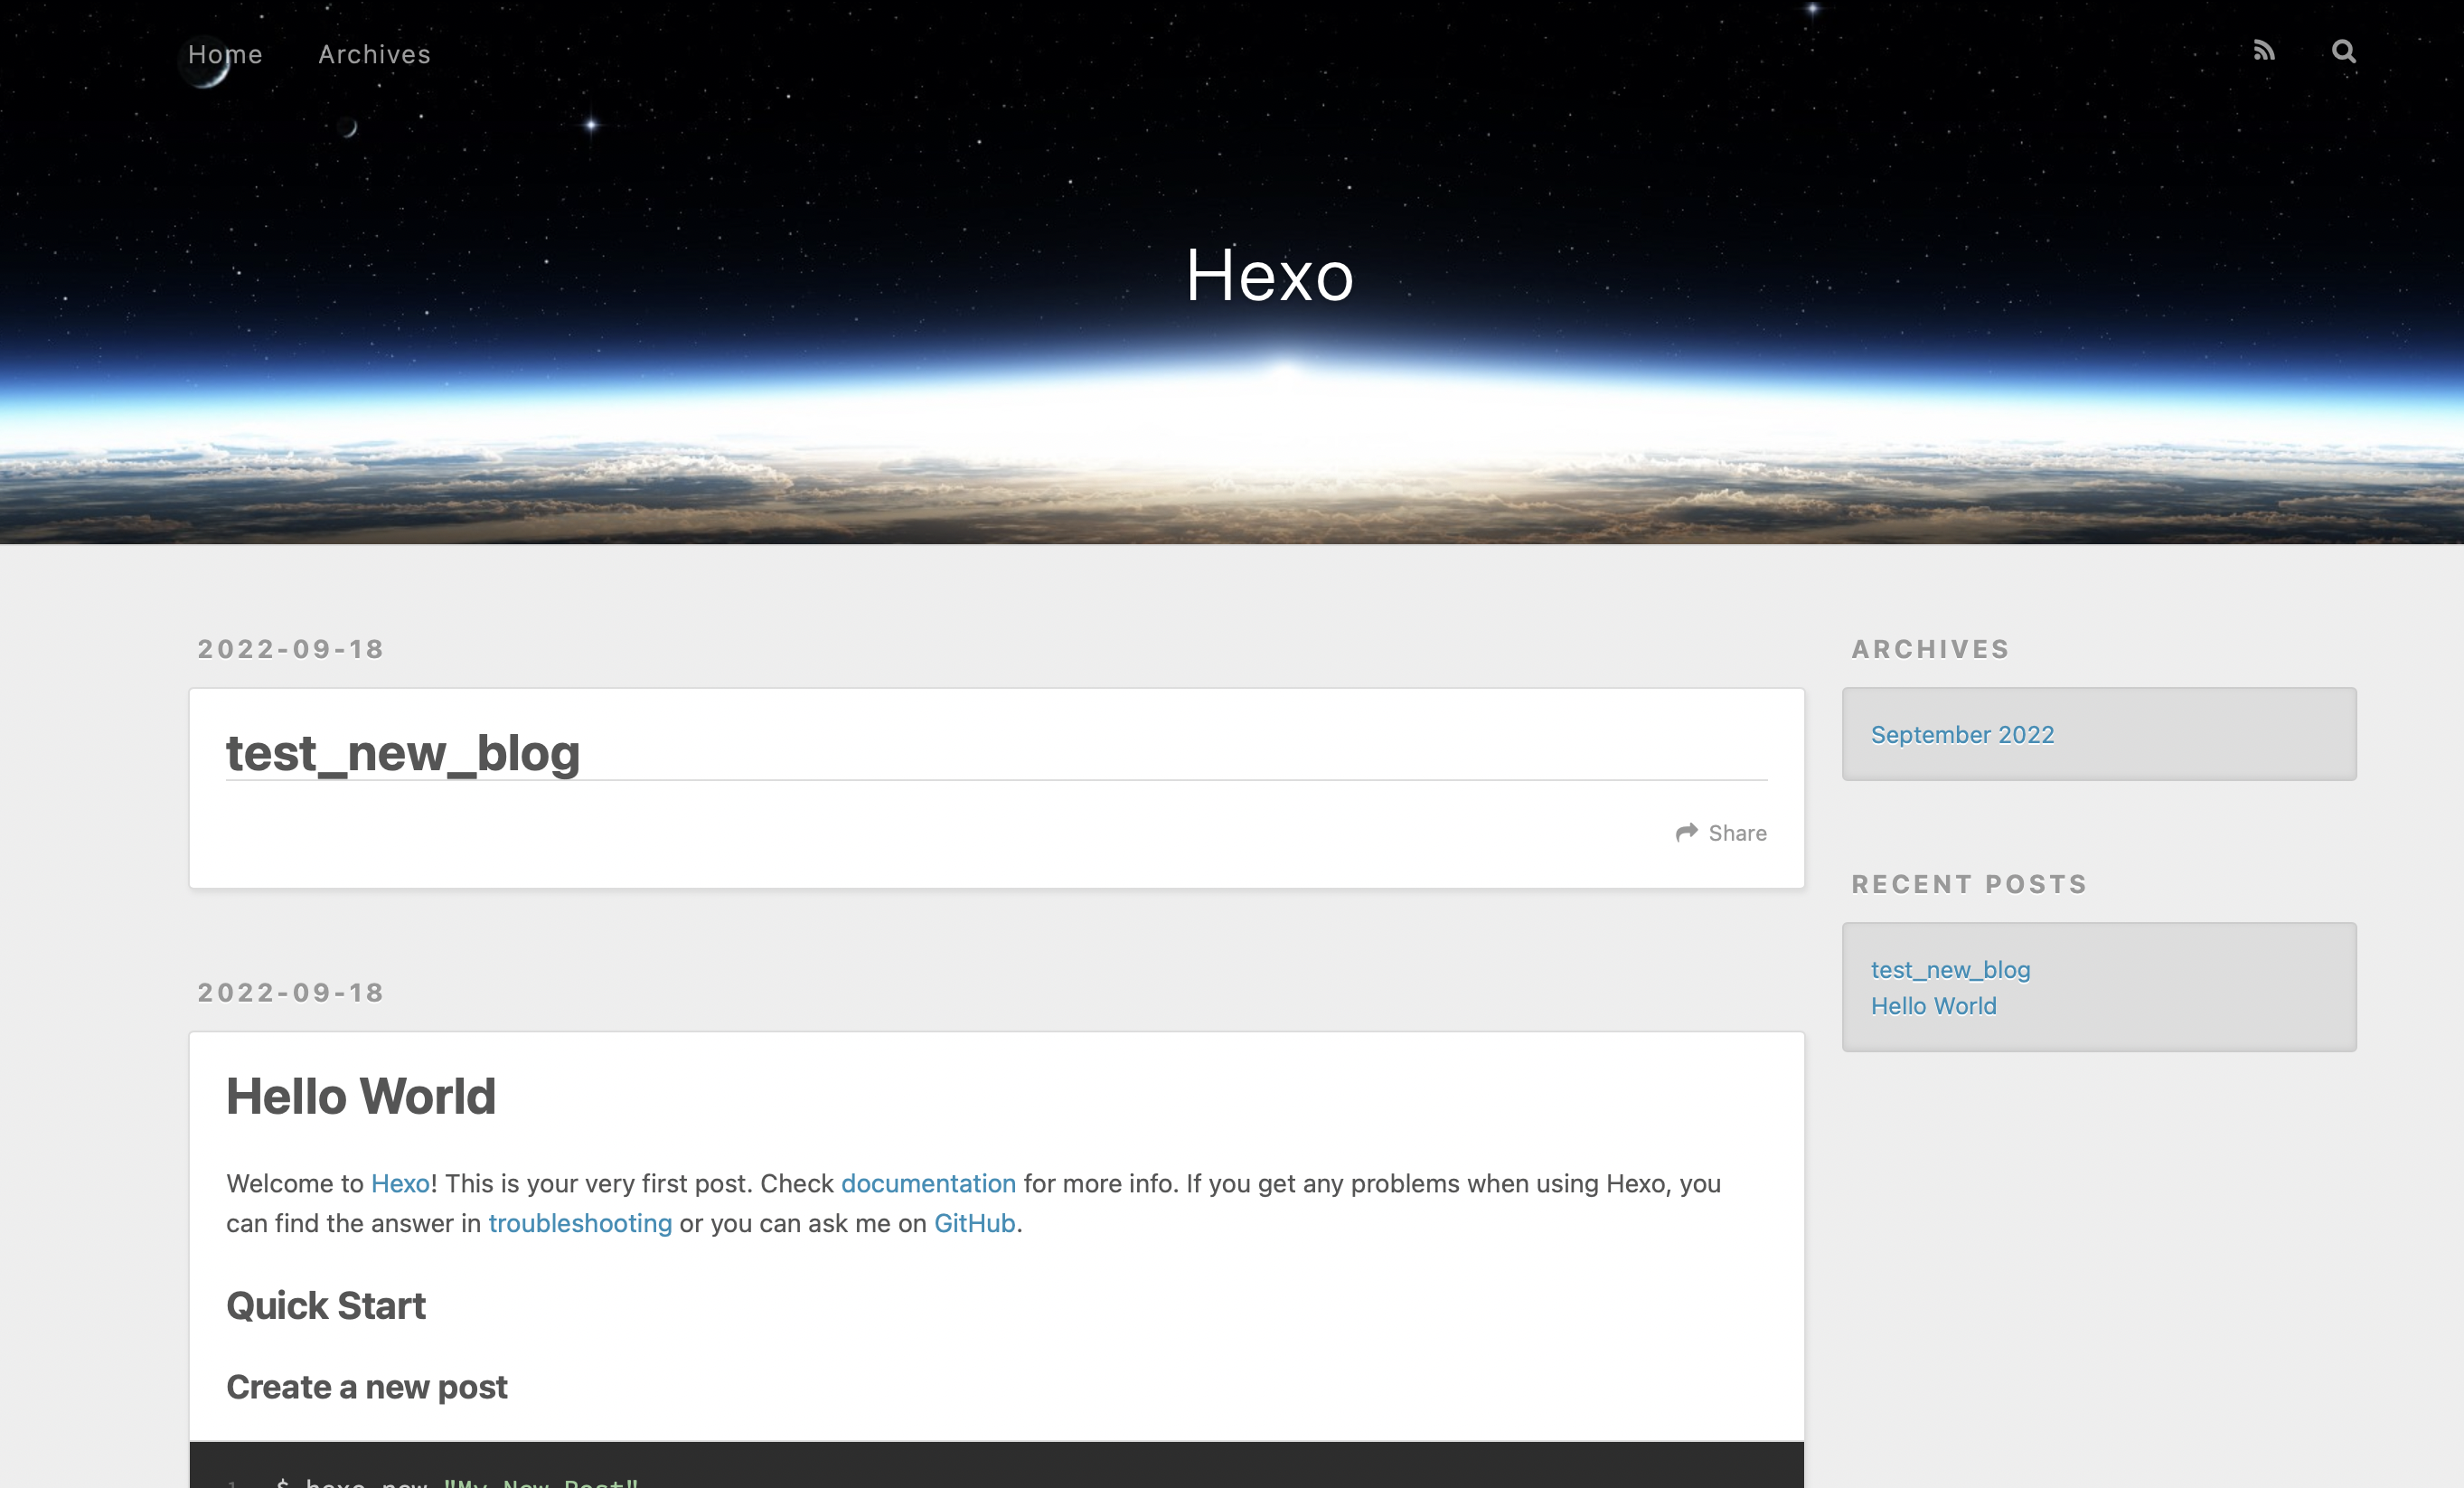
发布一篇文章试试:

1
2
3
# hexo new <title>
$ hexo new test_new_blog
# Hexo文件修改时会自动更新,无需重启 Hexo Server。

四、使用

1、创建页面

默认情况下,Hexo 会使用文章的标题来决定文章文件的路径。对于独立页面来说,Hexo 会创建一个以标题为名字的目录,并在目录中放置一个 index.md 文件。

1、创建新的页面

1
2
3
4
5
$ hexo new page categories
$ hexo new page tags
$ hexo new page archives
$ hexo new page about
$ hexo new page links

2、进入分类文件夹,并编辑文件

1
2
3
4
5
6
7
$ cd blog-hexo/source/categories
$ vim index.md
---
title: categories
date: 2021-09-18 18:23:51
type: categories
---

注意:分类页面和标签页面需要添加 type

3、添加页面链接。修改主题_config.yml配置文件,注意不是hexo的配置文件。

1
2
3
4
5
6
7
8
9
$ cd blog-hexo/themes/next/
$ vim _config.yml
# 去掉相关注释
menu:
home: / || fa fa-home
categories: /categories/ || fa fa-th
tags: /tags/ || fa fa-tags
archives: /archives/ || fa fa-archive
about: /about/ || fa fa-user

2、写作

1、创建文章

1
2
3
4
5
6
7
8
9
10
11
12
$ hexo new <title>
# 新建的文件在 source/_post/ 文件夹下
---
title: title
date: 2020-12-22 12:39:04
updated: 2020-12-22 12:39:04
comments: true
categories:
- [工具,Git]
tags:
- git
---

2、打开文件开始写作

3、本地发布

Hexo配置文件修改需要重新发布,主题配置修改自动修改。

1、生成静态页面

1
$ hexo g

生成页面在:blog-hexo/public目录下

2、启动本地服务

1
$ hexo s

4、部署到Github pages

1
2
$ hexo clean
$ hexo d

五、目录结构和插件介绍

目录结构

1
2
3
4
5
6
7
8
9
.
├── _config.yml # 配置信息
├── package.json # 应用程序的依赖版本管理文件
├── package-lock.json # 锁定依赖版本文件
├── scaffolds # 文章模版文件夹
├── source # 资源文件夹
| ├── _drafts # 草稿文件夹
| └── _posts
└── themes # 主题文件夹

插件

安装和卸载插件:

1
2
$ npm install hexo-deployer-git --save
$ npm uninstall hexo-deployer-git

插件列表:

1
2
3
4
5
6
7
8
9
10
11
12
13
14
15
16
17
18
$ npm ls       # 查看插件列表
hexo-site@0.0.0 /Users/zhengfa.hu/Study/blog-hexo
├── hexo-asset-image@0.0.5 # 图片显示插件
├── hexo-deployer-git@3.0.0 # 自动部署插件
├── hexo-generator-archive@1.0.0 # Hexo自带插件
├── hexo-generator-baidu-sitemap@0.1.9 # 百度站点插件
├── hexo-generator-category@1.0.0 # Hexo自带插件
├── hexo-generator-index@2.0.0 # Hexo自带插件
├── hexo-generator-searchdb@1.4.0 # 本地搜索插件
├── hexo-generator-sitemap@3.0.1 # 站点地图插件
├── hexo-generator-tag@1.0.0 # Hexo自带插件
├── hexo-neat@1.0.9 # 博文压缩插件
├── hexo-renderer-ejs@2.0.0 # Hexo自带插件
├── hexo-renderer-marked@5.0.0 # Hexo自带插件
├── hexo-renderer-stylus@2.1.0 # Hexo自带插件
├── hexo-server@3.0.0 # Hexo自带插件
├── hexo-theme-landscape@0.0.3 # 自带主题插件
└── hexo@6.3.0 # Hexo自带插件

六、修改主题

主题

主题官网 选择一个自己喜欢的主题。推荐NexTbutterflyPureHuxblogMaupassant ,个人喜欢NexTbutterfly

NexT 文档: https://github.com/next-theme/hexo-theme-next/blob/master/docs/zh-CN/README.md

butterfly 文档: https://butterfly.js.org/

安装主题

1
2
$ cd blog-hexo
$ git clone https://github.com/next-theme/hexo-theme-next.git themes/next

安装完成之后,修改_config.yml配置文件,文件目录: blog-hexo/_config.yml

1
2
3
4
# Extensions
## Plugins: https://hexo.io/plugins/
## Themes: https://hexo.io/themes/
theme: next

重启服务

1
2
$ hexo -g
$ hexo -s

其他配置可以查看 配置中文文档

主题目录结构

1
2
3
4
5
6
blog/themes/next/
├── _config.yml # 主题配置文件
├── languages # 语言(国际化)
├── layout # 布局文件夹。用于存放主题的模板文件
├── scripts # 脚本文件夹。在启动时会加载这个文件夹
└── source # 资源文件夹。例如js、css、images等文件

七、主题常用配置

NexT主题设置文档: https://theme-next.iissnan.com/theme-settings.html

黑暗模式

1
2
# Dark Mode  
darkmode: true

设置友链(推荐单独使用友链页面)

编辑主题配置文件

1
2
menu:
links: /links/ || fa-link

修改languages/zh-CN.yml

1
2
menu:
links: 友链

新建友链页面

1
$ hexo new page links

修改links/index.md

1
2
3
4
5
6
7
8
9
10
11
12
13
14
15
16
17
18
19
20
---
title: 友情链接
date: 2022-10-13 01:36:03
type: links
---
------
{% linkgrid %}
Jeremyhzf | https://jeremyhzf.com/ | 分享技术与生活. | https://jeremyhzf.com/images/avatar.png
Test | https://jeremyhzf.com/ | 暂无介绍~ | https://jeremyhzf.com/images/avatar.png
% Theme NexT | https://theme-next.js.org/ | Stay Simple. Stay NexT. | /images/apple-touch-icon-next.png
{% endlinkgrid %}
------
{% note success %}
**友链格式**
- 名称:Jeremyhzf
- 网址:[https://jeremyhzf.com](https://jeremyhzf.com)
- 头像:[https://jeremyhzf.com/images/avatar.png](https://jeremyhzf.com/images/avatar.png)
- 说明:分享技术与生活.
{% endnote %}

设置文章代码高亮和代码块样式

1
2
3
4
5
6
7
8
9
10
11
12
13
14
codeblock:
# Code Highlight theme 代码高亮主题
# All available themes: https://theme-next.js.org/highlight/
theme:
light: github
dark: github-dark
prism:
light: prism
dark: prism-dark
# Add copy button on codeblock 在代码块上添加复制按钮
copy_button:
enable: true
# Available values: default | flat | mac 代码块样式
style: mac

显示文章摘要

官方给出了三种生成摘要的方式

1、手动截断(推荐)

写博客是可是通过手动截断文章,并显示全文阅读链接

1
2
3
4
5
6
7
8
9
10
11
12
13
---
title: Hello World
---
Welcome to [Hexo](https://hexo.io/)! This is your very first post. Check [documentation](https://hexo.io/docs/) for more info. If you get any problems when using Hexo, you can find the answer in [troubleshooting](https://hexo.io/docs/troubleshooting.html) or you can ask me on [GitHub](https://github.com/hexojs/hexo/issues).

<!--more-->

## Quick Start
### Create a new post
``` bash
$ hexo new "My New Post"
```
More info: [Writing](https://hexo.io/docs/writing.html)

2、通过front-matter添加description

这种方式可以手动设置摘要显示的内容,进入文章详情后不会显示。

1
2
3
4
5
---
title: Hello World
description: 这里设置文章的摘要
---
Welcome to [Hexo](https://hexo.io/)! This is your very first post. Check [documentation](https://hexo.io/docs/) for more info. If you get any problems when using Hexo, you can find the answer in [troubleshooting](https://hexo.io/docs/troubleshooting.html) or you can ask me on [GitHub](https://github.com/hexojs/hexo/issues).

3、自动生成摘要(不推荐)

在主题配置文件中配置,默认截取长度 150 字符。

1
2
3
auto_excerpt:
enable: true
length: 150

设置404错误页面

新建404.html放在themes/next/source目录下(注意目录别放错了),添加以下内容(腾讯公益):

1
2
3
4
5
6
7
8
9
10
11
12
13
14
15
16
17
18
<!DOCTYPE HTML>
<html>
<head>
<meta http-equiv="content-type" content="text/html;charset=utf-8;"/>
<meta http-equiv="X-UA-Compatible" content="IE=edge,chrome=1" />
<meta name="robots" content="all" />
<meta name="robots" content="index,follow"/>
<link rel="stylesheet" type="text/css" href="https://qzone.qq.com/gy/404/style/404style.css">
</head>
<body>
<script type="text/plain" src="http://www.qq.com/404/search_children.js"
charset="utf-8" homePageUrl="/"
homePageName="回到我的主页">
</script>
<script src="https://qzone.qq.com/gy/404/data.js" charset="utf-8"></script>
<script src="https://qzone.qq.com/gy/404/page.js" charset="utf-8"></script>
</body>
</html>

八、添加第三方插件

1、评论系统

gitalk : 推荐。gitalk基于Github的Issue。

Waline: 推荐。

2、统计与分析

分析工具(全添加上)

google_analytics

baidu_analytics

Growingio Analytics

cloudflare_analytics

clarity_analytics(微软分析)

Matomo Analytics

统计工具(统计只需要选择一种)

推荐 不蒜子统计 或者 LeanCloud

1
2
3
4
5
6
7
8
busuanzi_count:
enable: false
total_visitors: true
total_visitors_icon: fa fa-user
total_views: true
total_views_icon: fa fa-eye
post_views: true
post_views_icon: far fa-eye

3、搜索服务

本地搜索和Algolia

十、更新

1、Hexo更新

1
2
3
4
5
6
7
8
9
10
11
12
13
14
# 检查升级npm本身
$ npm update -g
$ npm install -g npm # 更新 npm 版本

# 以下指令均在Hexo目录下操作
$ hexo version # 查看hexo当前版本
$ npm i hexo-cli -g # 全局更新

# 使用npm-check,检查系统中的插件是否有升级的。
$ npm install -g npm-check
$ npm-check
# 使用npm-upgrade,升级系统中的相关插件。
$ npm install -g npm-upgrade
$ npm-upgrade

2、主题更新

主题使用Git更新